
Button Maker Round 2 -1/4'' Mounted CT-1


Button Maker Round 2 -1/4'' Mounted CT-1
$724.00
- Stock: 1
- Model: MTD 225
- Weight: 23.00lb
- UPC: 658860274491
Model MTD 225, 2 1/4" Round Mounted Manual System
Model MTD 225 is a mounted system that consists of the Model 225 Button Maker Machine and Model 2625 (Paper) or 2225 (Photo) Graphic Punch Cutter mounted to a plastic board.
Product Features
- Button machines are all metal construction
- The button press cam-on-roller design requires very little physical force to operate
- The MTD system is compact and lightweight for easy storage and transport
- Cushioned hand grip
- Two-step button making process
- Swivel dieset increases speed
- "Positive stop" on the button press ensures upper and lower die alignment
- Rust-resistant plating on the dies
- "Zero scrap loss" engineering
- Entire circumference punched to exact dimension in one motion
- Graphic punch punches either graphics or photos
- Mounted onto a plastic high density polyethylene (HDPE) board with an attractive matte finish, rounded corners and edges, and non-marring rubber feet
- Operating instructions are mounted directly on the board for easy reference
- Weight: 23 lbs.
- Length: 15 7/8” Width: 12 5/8” Height: 6 1/2”
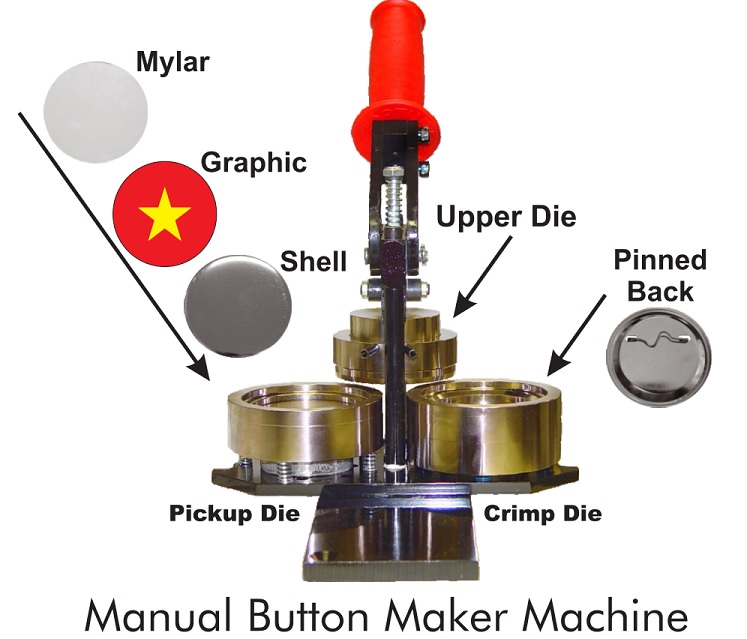
- Made in USAMade in USAButton Making Supplies: How to Make a Round Pinned Back Button 1. Identify the crimp die and the pickup die. 2. Rotate the die table so that the crimp die is positioned under the upper die. 3. Insert a shell into the pickup die with the sharp edge facing downward. Place the graphic on the shell. Place the mylar on top of the graphic. Line up the top of the graphic with the center column for correct orientation. 4. Rotate the die table one-half turn clockwise until the die table stop is against the outer column. 5. Pull the handle down as far as it will go and raise it back up to its rest position. 6. Place a pinned back into the crimp die with the sharp edge facing up. Line up the top of the pinned back slightly to the right of the center column for correct orientation. 7. Rotate the die table one-half turn counterclockwise until the die table stop is against the outer column. 8. Pull the handle down as far as it will go and raise it back up to its rest position. 9. Rotate the die table clockwise again to remove the finished button

")